Showing posts with label Vegetable. Show all posts

Wednesday, November 30, 2011

Squash Gratin


I don't think this is really a gratin. I think gratins have more cheese and maybe cream added, so I'm not sure what this is really, but it good!
-Amanda

Squash Gratin

1 large potato
1 yellow squash
1 zuchini
hanful of grape tomatoes
1/4 cup olive oil
1/4 cup fresh grated parmesan cheese
plenty of salt and pepper
herbs if you like: rosemary, thyme, oregano whatever your favorite!

In a nice baking dish or pie plate, pour a bit of oil and rub it all around. Peel and slice your potato in very thin rounds. Make a layer of potato around the bottom. Sort of like a crust. Slice squash and zuchini in equal size rounds. Carefully place them artfully around your dish. Top with sliced tomatoes, the rest of the olive oil, the parmesan and seasonings. Bake at 425 for 25 minutes until top is nice golden brown and potatoes are cooked through.

Thursday, November 17, 2011

Pecan Sweet Potato Casserole


On the Thanksgiving Table, I'm not sure if you should put this sweet potato recipe with the savories or the sweets. If you are being honest, it really is a dessert. And it is oh so good. And to think, growing up, I hated sweet potato casserole. Truth is I thought it looked funny because it was orange, I don't think I actually tasted it. Hopefully my sweet potato casserole will have a nut topping on it by tomorrow. The nuts are so good, I keep pinching a few here and there. Definitely double the nut part of the recipe if you want any left over for your sweet potatoes!
-Amanda

Sweet Potato Casserole

3lbs of sweet potatoes - I happened to have grown my own, but I'm sure the supermarket variety would be just fine!
4 tbsp oil
4 tbsp butter
2 tsp vanilla
1/2 cup brown sugar
1 beaten egg
about half a bag of marshmallows

Peel and chop sweet potatoes in big chunks. Toss in oil. Place on a baking sheet and bake at 400 degrees for about 30 minutes or until they are very fork tender. Place sweet potatoes in a baking dish. Add melted butter, brown sugar and vanilla. With a big fork, or a wire potato masher, mash potatoes in big chunks, keeping texture. Beat egg and stir it in to the potatoes, tempering the egg if the potatoes are still hot. Top with one layer of marshmallows. Bake at 350 degrees for 25 minutes or until marshmallows start to brown. Sprinkle candied nuts on top and push into the marshmallows.

Chili-Candied Nut Topping

2 cups of pecans
1/4 cup honey
4 tpsp butter
1/2 cup brown sugar
1 tsp chili powder
1 tsp cinnamon

Melt butter in a skillet. Add honey, brown sugar, chili powder and cinnamon. Stir until mixed. Add pecans and stir to coat. Cook on medium heat for about 10 minutes, but be careful not to burn the sugar. Pour out in a single layer on a silpat or parchment paper to cool completely. If making a day ahead once cool store in a zip bag or air tight container.

Originally posted on  11/26/09

Tuesday, August 30, 2011

Pea Salad

This is a recipe from my childhood. I do not know if it is a southern dish or a northern dish that traveled south. My memories of this dish are from when my Grandma Bettie made it. And, it was the ONLY way I would eat peas as a kid. No kidding. I normally would use a red apple for contrast but I was out of apples and my neighbor, being an awesome neighbor, lent me an apple and it was green, and so that was a perfect apple. Thank you Andrea! Oh, and I made this from a childhood memory so I don't know if it is the "right" way to make pea salad, but I'm pretty sure this was a popular dish in the 1970's. It should make a come back. It's good. Plus, it might get your kid to eat peas.
-Amanda

Pea Salad

1.5 cups frozen peas
1/2 tbsp butter
salt & pepper
1 apple
2-3 oz cheddar cheese, cubed
3 tbsp mayo (I make mine homemade)

In a small skillet, bring peas to a boil and cook for a few minutes. Drain, return to pot. Add butter, salt and pepper and allow peas to cool completely. Chop one apple, leaving the skin on. I try to cut it as close to pea size as possible. Do the same with the cheese. Mix the cooled peas, the apple and the cheese in a bowl with the mayo. Refrigerate and serve cold.


Sunday, August 21, 2011

Sweet Potato & Beet Hash

I was needing some inspiration because I've been stuck on the "what's for dinner" question. I've even been making menus but if you aren't excited about your menu, then cooking it isn't thrilling either. Luckily this morning I was watching Food Network and caught 10 Dollar Dinners. I like that show for Real Food, because most of the time, Melissa D'Arabian uses Real Food ingredients, and when she doesn't they are usually easy to sub out. To save money she is a bit carb heavy, but a lot of her dishes I either make less of the carb or just go without it and it is still great. Today she made this Sweet Potato and Beet Hash that looked intriguing to me. I've been trying to eat more beets because they are so good for you. So, sure the sweet potatoes have carbs, but they still have lots of good vitamins so, in moderation not a bad thing. Hubby and I really liked this side dish. One of my twins ate almost all of hers and my other girl ate a few bites without any complaints (but she filled up on steak, because she is my MEAT eater!) As for the recipe, I linked to her recipe, but when I made it, I just went off my memory of what she did. Here is my version.
-Amanda

Sweet Potato & Beet Hash

1 sweet potato
1 beet
1.5 tbsp olive oil
salt & pepper
3 pieces of nitrate free bacon
1/4 yellow or white onion
2-3 cloves garlic

Peel the sweet potato and the beet. Cut into 1/2 inch cubes. Toss in the olive oil, salt and pepper and place in one layer on a cookie sheet. Bake at 425 for about 25 minutes, flipping halfway through.

In a skillet, cook bacon that has been cut into small pieces. As the bacon is cooking add very small diced onion. Saute on medium high heat until onion is carmelized and bacon is crispy. Add minced garlic and cook for a minute or two more. Add the sweet potatoes and beets to the bacon and onions and stir.

Friday, July 22, 2011

Rood Vegetable Slaw with Cinnamon and Maple Syrup Dressing

I wish I was creative enough to have come up with this side dish, but since I've hardly ever eaten most of the root vegetables in it, I needed a recipe to follow. I found a recipe on a Raw food site that sounded really good. Her version was a bit different (she cut the vegetables differently and served it on lettuce) But it gave me a jumping off place to start. She also had some different vegetable choices. Use what you can find and go with it! I served this with fried haddock and butter. I had a bit of batter left at the end so I tossed in a few zucchinis too.
-Amanda

Root Vegetable Slaw with Maple Syrup Dressing

2 carrots
1 beet
about half a cup worth of rutabega
about half a cup worth of daikon radish
handful of dried cranberries

Cinnamon and Maple Syrup Dressing:
1/2 cup oil of choice (I used olive and coconut)
2-3 tbsp balsamic vinegar
1/4 cup grade B maple syrup
1 tsp cinnamon
1-2 tbsp dijon mustard (I got to use my homemade!)
1/4 tsp salt
water, if needed

I used a food processor to grate all of my root vegetables after washing and peeling each one of them. You could also use a mandolin to slice them if you want bigger pieces, use a hand grater or cut by hand if you really feel like your knife skills need that much work. I did wear gloves when handling the beet because I did not want red hands. Put all the vegetables in a large bowl along with the dried cranberries and toss well.

In a small bowl mix all the ingredients for the dressing. Taste and adjust as needed. I did not think mine needed the extra water that the original recipe called for, but I might have done less vegetables than she did. Pour over the vegetables and stir everything together. Let sit for a couple of hours in the refridgerator to let the flavors develop. This is really good!

Sunday, July 10, 2011

Grain Free Casserole

This was a winner in the house tonight! I don't know if I was super hungry from swimming or if it was just that good, but I went back for seconds! Good thing the recipe makes enough for two casseroles so you can freeze one. Just remember if you plan on freezing one, line your casserole dish with aluminum foil. Place the ingredients in the casserole and bake. Then you can cover and freeze. Once it is frozen solid, remove the foil "casserole brick" from you pan, wrap it with plastic wrap, label and put back in the freezer. That way you can use your pan for other uses. When you want to reheat, unwrap the plastic, put the "brick" back in the pan you cooked it in, and reheat in the oven.

I got the recipe for this casserole from Family Living Simple, but it was Paleo. I added cream, cheese, more tomato paste and  an extra egg.
-Amanda

Grain Free Casserole

2 zucchini
2 carrots
1 sweet potato
1 can of tomato paste
2 lbs of ground beef
10 button mushrooms
3 cloves garlic
1 onion
4 eggs
1/4 cup heavy cream
lots of mozzarella and parmesan
oregano, basil, salt and pepper

Cut your zucchini and carrots into thin noodles using a mandolin. If you don't have one, slice into thin slices and then cut each slice into small strips. Use a cheese grater or food processor to grate the sweet potato. Put the zucchini and carrot strips and grated sweet potato in a very large bowl. Toss to mix. Start cooking your beef and add chopped mushrooms, onion and garlic to it as it cooks. Add tomato paste, herbs and seasonings and mix well. Allow meat mixture to cool down.

Grate cheese into the vegetable mixture and toss. When meat mixture cools, add it to the vegetables and mix well. Beat four eggs and heavy cream together and pour into meat mixture. Using your hands, make sure everything is well incorporated and transfer to two oiled baking dishes. Preheat oven to 400 degrees and bake for 20 minutes covered and 20 minutes uncovered.

Wednesday, June 8, 2011

Tequila Lime Salmon Packets


I was super excited to find wild caught salmon on sale for $6.99 a lb a couple of weeks ago at my grocery store. It often goes for double of that. I only wish I had bought double what I did! Even so, I still got quite a bit of salmon and so now it's time to eat it all up. Luckily it was frozen, so I just brought it home and stuck it back in my freezer and didn't have to worry about freezing thawed out pre-frozen fish. (If that makes sense!) Salmon is also one of my kids favorite proteins. I think because it is pink and they are three year old girls. Whatever, it's a super good for you protein so I'll take whatever the reason is! Cooking fish in packets is a very easy way to prepare fish, so give it a try if you have never done it before!
-Amanda

Tequila Lime Salmon Packets w/mixed vegetables

Tequila Lime Marinade:
(all measurements are close approximations and can be tweaked to your liking!)
2 cloves of garlic
1 tsp fresh grated ginger
1 tbsp soy sauce
zest of one lime
juice of one lime
2-3 tbsp honey
3 tbsp tequila
1/2 cup olive oil

Vegetables:
2-3 carrots
1 zuchinni
2 handfuls of snow peas


Salmon:
4 filets


In a small bowl, grate the garlic and ginger. Add lime zest, soy sauce, lime juice, honey, tequila and olive oil. Whisk until mixed well. Taste and adjust, although it will be a bit strong because of the tequila. Pour in a small sauce pan and bring to a rapid boil for 15 minutes. Carefully (it's hot!) taste again, it should be more mellow. Adjust as needed. Set aside to cool down.


Cut carrot and zucchini into small sticks. Place in a small bowl along with the snow peas. Pour half of the marinade over the vegetables, cover and refrigerate.


Make packets about 1-2 hours before cooking. On a large sheet of parchment paper, place 1/4 of the vegetables in a pile, draining the marinade away. Place one salmon filet on top and season with salt and pepper. Add a bit of the marinade to the fish and rub it in. Seal the packet by crimping/folding all the way around. Do the same to the remaining 3 packets. Let marinade for 1-2 hours, no longer because the acid in the marinade will make the fish tough if you go too long.


Preheat oven to 400 and cook for 12-15 minutes. Before you cook the fish, press the fish gently with your thumb to see how much give is in the fish. After 12 minutes, press fish again through the packet with your fingers, it should be firm when done. Cook for a few minutes longer if it doesn't feel firm enough. Do not overcook or it will be dried out!

Tuesday, May 17, 2011

Roasted Tomato Salsa

First off, I know this isn't the best photo. But I was so busy eating it, I didn't want to slow down to photograph it! I really want to write down this recipe so I can repeat it in the future but I didn't really count everything so it's just sort of a guess. I plan on adding whey to what we didn't eat tonight and fermenting the rest to make it last longer (ha!) and to add probiotics to it. That is if it can sit on my counter for 3 days without being gobbled up... we'll see.
-Amanda

Roasted Tomato Salsa

8-10 tomatoes
1 red bell pepper
3 pablano peppers (you can throw in a spicy pepper or two also, but I just wanted the flavor, not the heat this time.)
1 large onion
5-6 cloves of garlic (paper still on)
Olive oil
sea salt

Line a cookie sheet (that has edges!) with foil. Lay the peppers out. You can keep them whole or go ahead and cut them in half and seed them. I seeded my bell pepper but kept the pablanos whole. Toss the garlic cloves still in their husks on the tray. Quarter the onion, removing the outer skin and place it on the tray. Cut each tomato in half and with a melon scooper, scoop out all the seeds and juice. Place cut side down on the tray. Liberally drizzle olive oil on everything and sprinkle with salt. Bake at 425 for 30 minutes or until everything starts to brown a bit.

Add vegetables to your blender, removing the skins from the tomatoes and peppers as much as possible. They should peel right off. Pulse a few times to keep things chunky but blended. Add salt as needed. Enjoy!

To ferment add 3-4 tbsp of whey, put in mason jars and let sit out on counter for 3-4 days until bubbles form. Refrigerate when done fermenting.

Tuesday, April 19, 2011

Ham Zucchini Rolls


I really get a lot of my inspiration from Food Network. Ever since my teen years, I have been a Food Network junkie. At one time, I used to know the names of every single show on the network. I could name celebrity chefs like most people could name the top bands on the radio. These days, I don't keep up as much as I used to but I still watch a show at least every few days! One of my recent favorites is $10 Dinners by Melissa D'Arabia. One thing that I like about her is the fact that she has twins, just like me! While I don't agree with some of the cheap shortcuts she makes, for the most part I really get inspired by her dishes. For the most part she uses Real Food ingredients. If she'd get rid of the boxed stocks full of MSG that would go a long way!

The other day she made a stuffed endive dish that looked really enticing. I didn't have endive, which I think she mentioned is a winter vegetable, so I decided to try the dish with zucchini instead of endive. I know that zucchini tastes nothing like endive, but sometimes it's all about the cooking method and not the ingredients. This came out pretty good! I wish I had a bit more patience so that the cheese would have browned more on top, but it still was really tasty.
-Amanda

Ham Zucchini Rolls

Bechamel Sauce
2 tbsp butter
2 tbsp flour
1 cup milk
1/4 cup cream
1 tsp dijon mustard
sea salt
1/4 freshly grated cheddar cheese

4 zucchinis
sliced cheddar for stuffing
4 pieces of shaved ham off the bone from the deli counter
1/2 cup grated cheddar for melting on top

Cut the ends off the zucchini and cut a slice lengthwise down each vegetable. Carefully squeeze slices of cheddar cheese in each zucchini. Wrap with a piece of ham and place in a baking dish.

Melt butter in a skillet. Add flour and whisk well. Cook the flour for a minute. Add milk and cream. Whisk in dijon mustard, salt and grated cheddar cheese. Boil to thicken. Pour over wrapped zuchini. Add remaining cheddar cheese. Bake at 375 covered for 15 minutes. Uncover and continue baking for 15-20 minutes more.

Tuesday, February 1, 2011

Kale Chips

Why haven't I tried this sooner? These are so good! Next time you are craving a savory salt treat, try these. Kale is super good for you and you won't even know you are eating something healthy when you munch into this crispy treat. As a matter of fact, my three year old twin daughters who have been known to turn their noses up at a vegetable or two literally couldn't get enough of these tonight. I should have made twice as many!
-Amanda

Cristpy Kale Chips

1 bunch of kale
1-2 tbsp extra virgin olive oil
garlic powder
sea salt
splash of apple cider vinegar

Preheat oven to 425 with your cookie sheet in the oven. Cut the stems out of the kale leaves and cut the kale into smaller pieces. Place them in a large bowl. Toss with olive oil, garlic powder, sea salt and apple cider vinegar. Coat really well, make sure the olive oil is on each part of the leaves. Remove cookie sheet from oven and pour kale onto hot sheet. Spread in one layer. Bake 10-12  minutes. Remove before they start to turn brown. The brown parts are a bit bitter. Enjoy! I've known people to crumble this up on their popcorn, it's that good.

Tuesday, January 18, 2011

Creamed Peas

When I was a kid, I hated peas. Seriously despised them! Then one day I decided to just "get over it!" I slowly taught my taste buds to accept peas in such dishes as Tuna Noodle Casserole and Shepard's Pie. Never did I think I'd eat an entire bowl of peas! But sure enough, one day I tried a bunch of peas mixed with mashed potatoes and ever since I have not had a problem with the little green balls. Now that Weight Watchers is a thing of the past and I'm learning all about good fats like cream, butter, lard, coconut oil and bacon grease an entire new world has opened up to me. Bring on the CREAMED vegetables! I mean, no wonder kids don't eat their vegetables, a steamed pile of bland soggy vegetables is nothing compared to ones cooked lovingly in butter and cream. And to think I'm feeding my brain with the healthy fat, getting in doses of vitamin A& D that you can't find in the plant world and losing weight to boot. To find out more about this nutrient dense diet I'm following, read Nourishing Traditions by Sally Fallon, soon you too will be putting butter on your plate.
-Amanda

Creamed Peas

2 cups of frozen peas
1 tbsp butter
1 tsp arrowroot
 1/2 cup heavy cream (raw is best, low pasteurized next best!)
1/4 cup parmesan
pinch of nutmeg
salt and pepper to taste

Steam peas until soft. Remove from pan. Melt butter in pan. Add arrowroot and stir. Add cream and cheese. Boil until the sauce thickens. Season to taste. Add peas back in and stir gently. Enjoy!

ps. This basically tastes like Alfredo sauce on peas. Yeah, it's good.

Monday, January 10, 2011

The best Mustard Greens I've ever had

Well tonight I made a roast chicken that came out pretty tasty (I'll post it later) but the star of tonight's dinner for me, was the mustard greens. I forgot to take a photo, I ate them too fast! This recipe would be exchangeable for Collard Greens, Spinach and perhaps Kale.
-Amanda

Best Ever Mustard Greens

1 bunch of mustard greens
3 cloves of garlic
2 pieces of bacon
1 tbsp of olive oil
pinch of hot pepper flakes
2 tbsp apple cider vinegar
1 tbsp real maple syrup
salt & pepper to taste

Prep mustard greens by either cutting off the stem, or ripping it out from the leafy part. Chop the greens into bit size pieces. In a good cast iron skillet fry up two pieces of bacon that has been cut into small pieces. When bacon is almost cooked, add olive oil, chopped garlic and hot pepper flakes. Stir that around for about half a minute and then add mustard greens. Use tongs to flip the greens over trying to get them all to wilt. When they are mostly wilted (only takes a minute or two) add apple cider vinegar and maple syrup. Season to taste. Let simmer on low for about 10 minutes to continue to cook out the bitterness from the greens. The sweet and salty combo of this side dish is so good you won't think you are eating something healthy!

Monday, December 27, 2010

Butternut Squash Pizza

I was reading my favorite cooking/nutrition blogs a few days ago, and came across this idea for a recipe. I wish I could give credit, because these are REALLY good. I did add caramelized onions and tomato sauce to the recipe, but the idea to use the squash this way wasn't mine. Anyway, this is a must try recipe, it is really terrific!
-Amanda

Butternut Squash Pizza

1 butternut squash with the longest neck possible
1 lb of bulk sweet Italian sausage (no nitrates added, no high-fructose corn syrup)
1 block of feta cheese
1 large onion
olive oil, salt and pepper
favorite tomato sauce

Pre-heat oven to 375. Peel butternut squash and cut into 1/2" disks, be careful to make them the same thickness so they cook evenly. Rub each disk with olive oil, salt and pepper. Bake on a cookie sheet for 20-25 minutes until you can easily pierce with a fork. Meanwhile, brown sausage in a skillet. Slice onion into very thin slices and saute them in a little olive oil (or bacon grease) while the sausage is a different skillet. Cook the onions on medium  heat for 20-30 minutes.

Remove butternut squash from the oven and switch the oven to broil. Assemble the pizzas by placing a bit of sausage on each disk, top it with a bit of onion and then the feta cheese. Place under the broiler for 4-5 minutes until feta starts to brown. Serve on top of some tomato sauce. It'd be great with some fresh basil on top, but I'm not sure if butternut squash and basil are ever in the same season? Anyway, this was a huge hit for our family and I think I'll hide the leftovers!

Thursday, December 16, 2010

Tomato Parmesan Soup

I think I could live off soup. I love how I can make a big pot of it and it lasts for a couple of meals. It's always easy to reheat, filling and warms my tummy. I once heard some philosophy that people are either "cold" food eaters or "hot" food eaters. I'm a hot food eater. I love a piping hot plate of food over a cold salad or sandwich any day. But it isn't always easy to make a hot plate lunch with a busy schedule. I think that is where soup comes in for me. Once I started making soups from scratch years ago, I could never go back to canned soup. Now that I know canned soup (and canned/boxed broths) are loaded with preservatives and MSG, my homemade soups are that more delicious! Now if only I could find a source of tomatoes that doesn't use BPA lined cans. I'm still working on that one! I do use fresh tomatoes quite often, but I am still relying on canned tomatoes frequently, it's one of the last canned items in my pantry. This tomato soup I cooked up in about 15 minutes.
-Amanda

Tomato Parmesan Soup

2 tbsp bacon grease
1/4 onion
3 cloves of garlic
1 large can of diced tomatoes
2 tsp basil
1 tsp oregano
1/2 tsp chili flakes
sea salt and fresh pepper
1/4 cup loosely packed freshly grated Parmesan cheese
1/2 cup heavy cream
1 handful of toasted pinenuts per bowl
1 dollop of butter per bowl

Place bacon grease, onion and garlic in a small pot. Cook on medium high until the onion is translucent. Add spices (basil, oregano, chili-flakes.) Adding the spices at this time gives them a chance to cook a bit in the bacon grease. Add can of tomatoes and bring to a boil for about 5 minutes. With a stick blender, blend the soup into a creamy consistency. Alternately you could use a regular blender. Add cheese and heavy cream. Remove from heat and stir. Serve with toasted pine nuts and a dollop of butter. Makes 3-4 servings.

Oh, I just had a wonderful thought.... I wonder if I took the idea of the roasted garlic from THIS soup recipe and incorporated it into this tomato soup recipe if I'd have an incredible soup? I'll have to play around with it and let you know!

Friday, November 26, 2010

From Scratch - Traditional Green Bean Casserole

I was asked to bring the green bean casserole to Thanksgiving Dinner this year, which I was more than happy to do since I love, love, love it. The only thing is, I'm no longer cooking from cans for the most part. There was a moment when I thought to myself that I could make an exception since Thanksgiving is all about traditional dishes and the traditional way to make green bean casserole as far as my memory goes is with the cans. Two cans of green beans, 2 cans of mushroom soup, 1 cup of milk and a can of Frenches Onions. But then I thought about it, and wondered if perhaps the dish could be made with real ingredients and still taste like my memories of the dish. I found a recipe on Kelley the Kitchen Kop's blog that I mostly used, putting my own spin on a bit of it.The biggest problem is I didn't really measure anything so this is more of a method than a recipe. Sorry about that! And this was a HUGE hit at Thanksgiving, I guess it lived up to expectations because there was none to take home!
-Amanda

From Scratch- Green Bean Casserole

Green Beans:
A bunch of green beans- about 7 cups
left over bacon grease
garlic clove
1 bay leaf
sea salt
pepper

Mushroom Sauce:
a lot of mushrooms- 5 cups or so
1/2 large onion finely diced
1 container of heavy cream preferably not pasteurized, but I haven't been able to get any of that yet.
1/4 cup flour - I used whole wheat
3 tbsp butter

Crunchy Onion Topping:
2 onions - I used a sweet yellow onion
1/2 cup arrowroot powder
Cajun seasoning
3 tbsp butter + more if needed

Cut the tips off your greenbeans and then cut them in halves or thirds. Put them in a large skillet and cover with water. Add plenty of sea salt, pepper, bay leaf, smashed garlic clove and bacon grease. Bring to a boil, reduce, cover and let simmer for 45 minutes taste and re-season as necessary. WHAT! Yes, you heard me. I'm not making a "Fresh" greenbean dish here... I'm mimicking greenbeans from a can and greenbeans from a can are much softer than beans that have been blanched for 5 minutes. No, they aren't vivid and pretty green but they are GOOD! Plus, this is how my Mema makes greenbeans and she's been doing it that way for years. Drain the greenbeans and set them aside.

To make the mushroom sauce, chop onion very small and place it in a large skillet with melted butter. Chop mushrooms as small as you like. Since I was again, mimicking the canned sauce, I chopped them fine since the canned stuff almost doesn't even hint at mushroom.... strange, right? Add the mushrooms to the softened, translucent onions and cook until they have cooked down quite a bit. Add more butter if the skillet is dry. Sprinkle flour across mushrooms and stir until there is no dry flour left. Pour in cream and bring to a boil to thicken.

Butter a baking dish, I used an oval one so I'm not sure what size. Pour the cooked green beans in it and top with the sauce. Stir them together. You could also mix them in the skillet and then pour in the baking dish, whatever is easiest. Set aside. Be sure to scrape the skillet and lick the spoon.... oh yeah, it's that good.

To make the topping, pre-heat oven to 475. Slice 2 onions (they cook down A LOT) into thin slices and place in a ziplock bag. Add arrowroot and seasoning. Toss until coated very well. Add melted butter and mix again. On a large cookie sheet that has been greased, lay out onions in a very thin layer. Use two sheets if needed. (I should have used two!) Place in the hot oven and stir every 8 or so minutes for about 30 minutes until they start to crisp up and turn brown. Top casserole and serve. If you are doing it the night before, do not top the onions or they will get soggy. If you can save the onions to the next day, do that. If not, store them in a bag with a paper towel and recrisp them in the oven for a little bit before topping the casserole. Enjoy!!!

Thursday, November 11, 2010

The only way to eat Brussel Sprouts

In my opinion, there is only way to eat brussel sprouts. I could be wrong, but in the few ways that I've tried them, this is the only way that they are good. And surprisingly they are more than just "good" when prepared this way. Excitingly, this recipe falls right in place with Nourishing Traditions and Weston A. Price. Isn't it great when a food that you thought was "fattening" really is healthy for you? By the way, this is my Mom's recipe that she usually pulls out at Thanksgiving, now it can be a year round dish!
-Amanda

Roasted Brussel Sprouts in BACON!

12-15 small brussel sprouts
1/8 cup of olive oil
1 garlic clove smashed
sea salt
pepper
2-3 strips of bacon

Cut all of the brussel sprouts in half and place in a bowl or zip lock bag. Add the olive oil, salt and pepper. Smash garlic into small bits and add to the brussel sprouts. Cut the bacon into little bits. Add to brussel sprouts. Toss everything to coat well. Place on a baking sheet and cook in a 450 degree oven for 25 minutes or until brussel sprouts are brown and bacon is crisp.

Monday, October 4, 2010

Hearty Vegetable Soup

Last Thursday, I had a playdate at my friend Angela's house. She served some delicious vegetable soup for lunch. I've been wanting more ever since I left her house! I somehow forgot to get the recipe from her, but I did remember she said two things. One: the soup was made with homemade chicken stock from the Nourishing Traditions Cookbook. And Two: the only seasonings were salt and pepper. So I recreated my version or her soup. But as it sometimes goes, mine wasn't as good as hers, because sometimes being served a warm bowl of soup made with love tastes better than what can come out of your own kitchen! Nevertheless, it was still yummy and I'm glad I made an entire pot of it!
-Amanda

Vegetable Soup

1 potato, skin on, scrubbed clean
2 large carrots
small head of broccoli
1 small onion, I used a yellow one
2 tbsp olive oil
Greens- I used about 1.5 cups frozen turnip greens, I'm pretty sure Angela's soup had kale. If you use fresh, you need a lot more since it will cook down. spinach, collard greens or chard are all good choices for this type of soup.
5 cups of homemade chicken stock

Dice onion into small pieces.Put olive oil in a medium size pot and heat medium-high. Add onion. Scrub potato and dice it into small cubes, add to pot. Scrub the carrots, I rarely peel them either. Cut lengthwise and cut into small semi-circles. Add them to the pot. Stir occasionally so potatoes don't stick. Add broccoli, greens and broth. Reduce heat and simmer for at least 30 minutes. Garnish with a bit of grated Parmesan and serve with bread & butter.

Wednesday, September 15, 2010

Cabbage Egg Rolls

This is an old Weight Watchers recipe that is so good that you don't have to be on Weight Watchers to enjoy them. I took them to a pot luck dinner last night because they are fine at room temperature. I only made about 30 of them, but they all disappeared, I should have made more!
-Amanda


Baked Cabbage Eggrolls

1 small head of cabbage, shredded
3-4 carrots, shredded
4 scallions, sliced thin
4 tbsp soy sauce
2 tbsp rice wine vinegar
2 tsp sesame seed oil
1 tsp (or more if you like it hot) Asian Chili Garlic Sauce

3 tsp grated fresh ginger
3 tbsp corn starch
25-30 wonton wrappers 
cooking spray

Put shredded cabbage in a large bowl and cover with plastic wrap. Microwave 8-10 minutes until cabbage is wilted. Drain any excess water and return to bowl. Add shredded carrots and scallions. In a small bowl, mix the soy sauce, rice wine vinegar, sesame seed oil, chili sauce and ginger. Add cornstarch and mix until the cornstarch has dissolved. Drizzle over cabbage mixture and stir until well mixed. Taste your cabbage at this point to make sure it has enough flavor. You may need to mix up a bit more of the sauce an add it, depending on how much cabbage you have and how strong you want your eggrolls to be.


Take one wonton wrapper, and place about 2 tbsp of cabbage mixture in the lower bottom corner. Roll the bottom corner up towards the middle of the wrapper. Fold the left side in and then the right side. Continue rolling, wetting the top corner with a bit of water to make wonton stick. Place on a greased cookie sheet. Continue with all of your wrappers. Keep about 2 inches space between each eggrolll so they will get crispy. Spray each eggroll with cooking spray and bake at 350degrees for about 25 minutes or until golden and crispy on the edges. For an easy dipping sauce I make another batch of the soy sauce mixture leaving out the cornstarch. Float a few sesame seeds & cut scallions on top for a nice finish. Makes about 25-30 rolls depending on the size of your cabbage. 

If I'm making these for myself at home, once they are completely cool, I store them in the refridgerator in a large ziplock back with a papertowel to catch moisture. I either eat them cold or toast them in my toaster oven for a minute or two.

Tuesday, August 24, 2010

Fish Tacos

We had fish tacos for dinner tonight. They turned out great! Normally I think I'd use a corn tortilla for fish tacos but I already had some of these homemade wheat flour tortillas in the freezer so we went with what we had. I served up some homemade oven fries and some fresh cantaloupe on the side. The crisp coleslaw with a homemade yogurt dressing was a perfect accompaniment to the fish.-Amanda

Fish Tacos:
4, 6-8 inch flour tortillas (recipe HERE)
4 pieces of cod (or other firm fish)
marinade for fish:
    juice of one lemon
    1 tbsp olive oil
    pinch of red pepper flakes
     1/8 tsp ground cumin
     1 smashed garlic clove
     1/8 tsp oregano
     1/2 tbsp rice wine vinegar
     salt

Coleslaw:  
1/8 of a head of cabbage
1 grated carrot
Sauce for coleslaw:
    1/4 cup greek style yogurt (or homemade yogurt that has been drained in a cheesecloth overnight to thicken)
    1 tbsp honey
    1 tsp mustard
    salt & pepper
    1/2 tbsp olive oil

Whisk all the ingredients for the fish marinade together and set fish in it to marinade for about 1 hour. Drain marinade away from fish. Cook in a very hot skillet until fish can be easily flaked with a fork.

To make coleslaw, mix the yogurt, honey, mustard, olive oil and salt & pepper. Cut the cabbage into very small pieces and add the grated carrot. Pour sauce on top and let sit for an hour.

Built taco with tortilla, coleslaw and fish. I also added a bit of diced raw red onion on top. I served with oven fries and cantaloupe on the side.

Monday, August 2, 2010

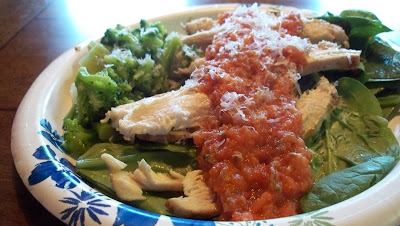
Simple Tomato Sauce Chicken Over Spinach Leaves

As most of you already know, I'm on a processed free kick. The more reading I'm doing the more I've come to realize how many chemicals we eat every day and it is pretty scary. But cooking homemade from scratch cooking doesn't always have to be time intensive! I'm also trying to eat more veggies and less carbs and a lot of times carbs are what takes the longest in a meal to cook. This dinner took only 15 minutes to assemble. The tomatoes cooked in the oven on low heat for 2 hours, but you could do them quicker if needed by broiling instead of slow roasting.
-Amanda

Simple Tomato Sauce Chicken Over Spinach Leaves

2 large chicken breasts
2 tbsp olive oil
1 lb roma tomatoes
3 garlic cloves
1 yellow onion
2-3 cups spinach leaves
fresh grated parmesan to sprinkle on top

To make roasted tomato sauce, slice roma tomatoes in half. Place on a cookie sheet along with the onion that has been quartered and the garlic cloves, still in their paper. Drizzle olive oil on top and coat vegetables well. Roast at 275 for 2-3 hours (turning once) until nice and caramelized. Puree in a food processor (removing the skin from the garlic.)

Pound chicken breast out so it is even, season with salt and pepper. Pre-heat your indoor grill skillet to very hot. Cook chicken about 4 minutes on each side. Let rest before slicing.

Assemble: place spinach leaves on plate, top with chicken and tomato sauce. Sprinkle on a bit of parmesan cheese and enjoy! I served with another side of veggies to be carb free, but this would of course be great with pasta!
Blog Widget by LinkWithin