Sunday, July 24, 2011

Frittata

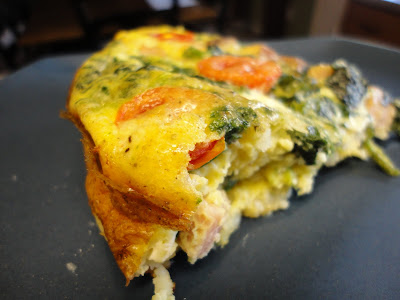
 Last nights dinner was a simple frittata. I love making things with spinach incorporated because my girls like spinach that way. If I give them a side dish of spinach they turn their noses up though. This was super easy to put together and tasted delicious. It was one of those dishes that will be hard to recreate since I used leftover potatoes from a chicken roast from a few nights ago. The potatoes had soaked up all the chicken juices and they were divine. You could sub in some boiled potatoes that are mashed with butter, but they wouldn't taste exactly the same.
-Amanda


Frittata

6 eggs
1 cup of diced ham
1 cup of cooked spinach, drained
4 cherry tomatoes
1/2 cup heavy cream
salt & pepper
sprinkle of parmesan
2 cups of cooked diced potatoes
olive oil/butter


Preheat oven to 350. Fry the ham in your oven safe skillet in a bit of butter, bacon grease or olive oil. While that is frying, in a large bowl, whisk your eggs together. Add cream, salt and pepper. Add the cooked ham and cooked (drained) spinach. In the hot skillet, press down/smash your potatoes to form a crust. Let them brown for a few minutes and then remove the skillet from the heat. Pour egg mixture in the skillet. Slice your tomatoes and lay on top. Sprinkle with Parmesan and drizzle with some olive oil. Bake for 25-30 minutes until eggs set. Let cool for 5 minutes before cutting.

Friday, July 22, 2011

Rood Vegetable Slaw with Cinnamon and Maple Syrup Dressing

I wish I was creative enough to have come up with this side dish, but since I've hardly ever eaten most of the root vegetables in it, I needed a recipe to follow. I found a recipe on a Raw food site that sounded really good. Her version was a bit different (she cut the vegetables differently and served it on lettuce) But it gave me a jumping off place to start. She also had some different vegetable choices. Use what you can find and go with it! I served this with fried haddock and butter. I had a bit of batter left at the end so I tossed in a few zucchinis too.
-Amanda

Root Vegetable Slaw with Maple Syrup Dressing

2 carrots
1 beet
about half a cup worth of rutabega
about half a cup worth of daikon radish
handful of dried cranberries

Cinnamon and Maple Syrup Dressing:
1/2 cup oil of choice (I used olive and coconut)
2-3 tbsp balsamic vinegar
1/4 cup grade B maple syrup
1 tsp cinnamon
1-2 tbsp dijon mustard (I got to use my homemade!)
1/4 tsp salt
water, if needed

I used a food processor to grate all of my root vegetables after washing and peeling each one of them. You could also use a mandolin to slice them if you want bigger pieces, use a hand grater or cut by hand if you really feel like your knife skills need that much work. I did wear gloves when handling the beet because I did not want red hands. Put all the vegetables in a large bowl along with the dried cranberries and toss well.

In a small bowl mix all the ingredients for the dressing. Taste and adjust as needed. I did not think mine needed the extra water that the original recipe called for, but I might have done less vegetables than she did. Pour over the vegetables and stir everything together. Let sit for a couple of hours in the refridgerator to let the flavors develop. This is really good!

Friday, July 15, 2011

Egg Rolls

Oh yum! I was totally craving egg rolls. The thing is whenever I order them they don't taste as good as I think they should. So, I decided to make my own. I did buy pre-made wonton wrappers, because I think that is probably out of my skill reach. But now that I think about it, I do have a pasta roller, and really, they are kind of like pasta... I wonder if they are made the same way? Something to ponder. In the meantime, egg rolls are sort of labor intensive even without making your own wrappers so I'm not sure that it is something I'll ever do. (Uh, oh... do I hear a challenge?) Since I wanted the egg rolls to be the star of the dinner instead of an app or a side, I kept the side dish pretty simple. Just a quick stir fry of sesame ginger carrots and broccoli. One neat trick was to use the rest of the egg that I needed to seal the wonton wrappers in the vegetable stir fry. When you are buying pasture raised eggs, you don't want to waste them!

I made two quick dipping sauces a simple sweet and sour and a soy-sesame. I use an organic, traditionally prepared soy sauce that has been fermented. Be wary of soy sauce that is made from GMO soy that was not fermented. Non-fermented soy sauce is very hard to digest. (Read more here: Dangers of Soy.)
-Amanda

Egg Rolls
(very approximates on the ingredients!)

package of won ton wrappers
1 lb of ground pork
3 cloves garlic
1 cup of finely shredded cabbage
1 cup of finely shredded carrots (I used my vegetable peeler all the way through the entire carrot, and then ran my knife over the shreds.)
2 scallions, cut fine
3/4 cup bean sprouts
handful of parsley
soy-sesame sauce (recipe below)
1 egg for wash
lard/coconut oil for frying

In a medium size skillet cook pork and grated garlic cloves. In a large bowl, mix the cabbage, carrot, bean sprouts, scallions and parsley together. Add cooled pork. Mix well. Pour sauce, mix and let sit for at least one hour. Lay out wonton squares. Put about 3 tbsp of pork mixture in the bottom of one corner (drain as much of the liquid as you can.) Fold over and roll to the middle. Wrap the left and right sides in. Brush the top corner with egg wash and finish the wrap. Set aside and roll all egg rolls. Fry in hot lard. I only had enough to half cover the egg rolls, so I had to roll them in the oil carefully until golden brown all around. (I had enough mixture to make 16 egg rolls)

Soy-Sesame Sauce:
1 tsp arrowroot
2 tsp freshly grated ginger
1/2 cup rice wine vinegar
1/2 tsp toasted sesame oil
1/2 cup soy sauce
3 cloves grated garlic
4 tsp honey

Whisk all ingredients together except for arrowroot. Remove half for dipping sauce. Whisk arrowroot into remaining sauce for egg rolls.

Easy Sweet and Sour Sauce

1/4 cup of apricot jam (no sugar added, all fruit)
1/8-1/4 cup of rice wine vinegar (taste as you go to your prefrence.)
1 garlic clove, grated
1 tsp grated ginger

Ginger-Sesame Carrots & Broccoli

3 carrots
1/2 head of broccoli
splash of soy sauce
1/2 tsp toasted sesame oil
1 tsp ginger
leftover egg wash (optional)
sesame seeds
scallion
olive oil

Put olive oil in pan. Pour egg and let it cook like a pancake. Remove. Chop carrots and broccoli and saute in olive oil. Grate in some ginger, add a splash of soy sauce. Add in egg, scallion, and sprinkle with sesame seeds.

Monday, July 11, 2011

Apple & Bacon Salad

I'm trying to add a few more salads into the rotation because they are usually pretty quick to make and for summer, salads just seem right. This was a very hearty and tasty salad that was approved by everyone. John said he thought the avocados were a bit odd in it and I think my girls were just going to eat the bacon until I encouraged them to taste a bit more! I think some dehydrated cranberries would be good in this too!
-Amanda

Apple and Bacon Salad

1/2 head of lettuce
2 handfuls of fresh spinach
1 package of bacon
1 avocado
1 large apple, chopped
1 cup of slivered, freshly toasted almonds
1/2 a cucumber, sliced
1/4 purple onion
homemade honey mustard dressing (see below)

Cut bacon into bite size pieces and cook until crispy. Chop lettuce and spinach into bite size pieces. Wash and dry thoroughly. Add to a very large salad bowl. Add diced apple, avocado, toasted almonds, chopped cucumber, thinly sliced onion and drained bacon. Toss. Serve with honey mustard dressing. Made enough for two adult portions. 


Honey Mustard Dressing
(these are NOT exact amounts, I just eye balled it!!)

1 tsp mustard (I got to use my homemade mustard!)
2 tsp honey
1 tbsp rice wine vinegar
1/4 cup avocado oil
1/4 cup olive oil (If you don't have avocado oil, just use olive oil)
1 grated garlic clove
salt and pepper
pinch of dried herb such as thyme, tarragon or oregano (optional)

In a small bowl, whisk honey and mustard together. Drizzle oils in slowly whisking continuously. Add rice wine vinegar, garlic and salt. If it is too thick and the flavor is good, add a bit of water. Otherwise adjust oil and vinegar until you get the acidity level that is good for you.

Sunday, July 10, 2011

Grain Free Casserole

This was a winner in the house tonight! I don't know if I was super hungry from swimming or if it was just that good, but I went back for seconds! Good thing the recipe makes enough for two casseroles so you can freeze one. Just remember if you plan on freezing one, line your casserole dish with aluminum foil. Place the ingredients in the casserole and bake. Then you can cover and freeze. Once it is frozen solid, remove the foil "casserole brick" from you pan, wrap it with plastic wrap, label and put back in the freezer. That way you can use your pan for other uses. When you want to reheat, unwrap the plastic, put the "brick" back in the pan you cooked it in, and reheat in the oven.

I got the recipe for this casserole from Family Living Simple, but it was Paleo. I added cream, cheese, more tomato paste and  an extra egg.
-Amanda

Grain Free Casserole

2 zucchini
2 carrots
1 sweet potato
1 can of tomato paste
2 lbs of ground beef
10 button mushrooms
3 cloves garlic
1 onion
4 eggs
1/4 cup heavy cream
lots of mozzarella and parmesan
oregano, basil, salt and pepper

Cut your zucchini and carrots into thin noodles using a mandolin. If you don't have one, slice into thin slices and then cut each slice into small strips. Use a cheese grater or food processor to grate the sweet potato. Put the zucchini and carrot strips and grated sweet potato in a very large bowl. Toss to mix. Start cooking your beef and add chopped mushrooms, onion and garlic to it as it cooks. Add tomato paste, herbs and seasonings and mix well. Allow meat mixture to cool down.

Grate cheese into the vegetable mixture and toss. When meat mixture cools, add it to the vegetables and mix well. Beat four eggs and heavy cream together and pour into meat mixture. Using your hands, make sure everything is well incorporated and transfer to two oiled baking dishes. Preheat oven to 400 degrees and bake for 20 minutes covered and 20 minutes uncovered.

Saturday, July 9, 2011

Spinach Dip Omelet

If you use a bit of imagination, this photo is a perfect looking omelet. I think I sort of overstuffed it, but it was no matter, because it was a really good omelet. Last night I made the Spinach Dip Stuffed Chicken Breasts, and I had a few tablespoons of the stuffing leftover. I was going to throw it away, because it wasn't enough to do much with, but I hate throwing away any good food. Then it came to me, make an omelet! A fancy omelet. Oh yum. I actually sauted some bacon, mushrooms and artichoke hearts for the omelet too. (I was going to put the artichoke hearts in dinner last night, but since my husband doesn't care for them, I left them out.) Anyway, I'm not going to post a recipe, because omelets are pretty straight forward, but I just wanted to put the idea in your head, that sometimes a few tablespoons of leftovers can be transformed into a fun and different omelet the next day!
-Amanda

Friday, July 8, 2011

Spinach Dip Stuffed Chicken Breast

Oh yeah, this is good. Ooey and gooey in the middle, crisp bacon up on top. Yummy! Next time, I'll flip them over and broil the underside too, so that both sides of bacon get crispy. I'm posting this recipe to "Traditional Tuesdays" go check them out!
-Amanda

Spinach Dip Stuffed Chicken Breast

3 large chicken breasts
6 pieces of bacon
1/2 cup cream cheese, room temperature
10 oz frozen spinach, thawed and strained really well
1/2 cup sour cream
1 cup fresh grated jack cheese
salt/pepper/chili powder

I brined the chicken breasts overnight, which is optional, but will help keep the breasts flavorful all the way through, tender and moist. To brine them, just cover them with water, add a splash of apple cider vinegar, a few cloves of garlic and a couple of tablespoons of salt. Cover and refrigerate. You can also make the stuffing ahead of time.

Stuffing: Mix cream cheese, sour cream, jack cheese, and spinach in a bowl. Add seasonings. Stir until everything is well incorporated.

Cut each chicken breast lengthwise in half and pound out flat with a mallet. Mound about 3 tbsp in the center of breast and then roll them closed. Secure with a toothpick. Wrap 2 slices of bacon around each chicken, sealing off the ends that are open to the stuffing. Place on a rack and then over a cookie sheet or other dish. Bake at 375 for 35 minutes. Broil on high for 5 minutes, then flip them over and broil for 5 more minutes.

I did a simple sauce of reduced heavy cream, parmesan and chicken stock to pour over the tops of the chicken. I plan on freezing the leftovers for future meals.

Tuesday, July 5, 2011

Mustard

My first batch of homemade mustard hits the fridge... (it's sitting next to some homemade yogurt and strawberry flavored kombucha.) Of all the condiments, this should be the first to make homemade because it is so easy it's hardly a recipe. My friend Nicole Rice of A Life Well Nourished, shared the method with me and I had to call her twice to make sure there wasn't "anything" else to it. All it really needs is a bit of patience! I made a bunch, because I know we'll go through it fairly quickly and because it is fermented it will last a long time.
-Amanda

Probiotic Mustard

about two cups of plain very strong kombucha
8 oz of mustard seed
3 cloves of garlic

Pour mustard seed in a jar that is twice as tall as the seed, to give it room to rehydrate. Add garlic cloves. Cover with strong kombucha. (My timing worked out perfectly for this recipe because right when I wanted to do it, I had some kombucha that I'd been ignoring in my pantry for about 2 months that was very strong!) The first day or so watch the mustard and as it starts to expand (rehydrate) keep covering with kombucha, you want all the seeds to be under the liquid. Set on your counter and let ferment for 5-7 days. Pour in a blender and puree. You've got mustard. Nicole likes to add horseradish while pureeing, but I found it was pretty spicy on its own. I added honey because we love honey mustard.

Sunday, July 3, 2011

A Real Food Reflection

As I was driving along today running some errands, I was thinking about my real food journey and how far I've come in the past 8 months or so. I'm really proud of the way I eat (for the most part) these days and I'm still excited to learn more new things every day. I know I still have a long way to go to get to where I want to be. Sometimes the allure of the convenience foods, still pulls me. What I am starting to learn though, is that after I eat the food that I thought was convenient, I don't feel as well. I'm more tired, or more bloated. Not to mention going to get a fast food, really isn't as fast as you'd think.

The other night, I was pretty worn out from a very busy day. Dinner plans had gone awry and in the past it would have been a perfect excuse to call out for Chinese or pizza delivery. Instead, I just made a simple dinner of bacon and eggs for everyone. It was Real Food, and took less time to make than it would have taken for the pizza to arrive. The meal only dirtied one skillet and I felt good after eating them. That night I went on a bike ride, which I know I would not have been up for if I'd eaten delivery pizza. It really got me to thinking.

I've also noticed how far I've come in deprogramming myself from the grips of commercial food conglomerates as far as snack foods go. In the past, I felt like I needed a granola bar, a peanut butter cracker package, a small bag of mixed nuts (that I now know has MSG added) or other pre-packaged snack foods with me at all times. I used to be hypoglycemic and if I didn't have food on me at all times, I'd get dizzy, irritable and light headed until I ate something. Now, I rarely ever get that way. I still keep a bag of soaked and dehydrated nuts (to get rid of the phytic acid) and dried fruit in the diaper bag, but when I eat Real Food meals, full of real fats, I don't usually need a snack in the middle of the day. I was cleaning out my pantry the other day and I found a few packages left over from 8 months ago when I last bought boxes of those pre-packaged snacks I mentioned before.

At first I felt like I should save these packages as a "just in case" I needed them for something. Then it dawned on me, that even if I did need a quick snack, I no longer would choose to eat those kinds of foods. I read somewhere, "I can not unlearn the things that I have learned." And that quote has really stuck by me in my Real Food adventure. When you are really present to the chemicals and genetically modified foods that do harm to your body, you really don't want to eat them any more. In the past 8 months instead of grabbing those packages, I grab a hunk of cheese, a glass of raw milk, eat a small bowl of yogurt or many other foods that don't come in cute packages with bright graphics.

The other day, I had to pack a lunch to go for my twins. In the past I would have packed a sandwich, some crackers and maybe a string cheese. Not horrible, but not great. Instead I packed a hard boiled egg, a few soaked & dehydrated almonds, a small serving of raisins, a hunk of real cheese broken into bite size pieces and a banana. It just looked healthier. There was a naturalness about it. Plus, without filling them up on carbs, but more protein, it gave my girls the energy they needed to get through a big day.

These days, when I'm at the grocery store filling up my cart, I actually am proud of my food choices. I no longer cringe at myself as a case of soda rolls across the conveyor belt knowing it wasn't good for me but feeling helpless and powerless not drink it. As time goes on, I want to get further away from a conventional grocery store and learn to buy most of my foods from local farmers and ranchers, but I'm still working through the baby steps. I'm starting to think for myself and not just grab the closest food-like item to shove in my mouth. I'm taking the time to learn traditional methods of food preparation and learning to really appreciate foods for their own unique flavors, not a chemical approximation of what a consumer "should" like, coated in sugar. 
Blog Widget by LinkWithin