Saturday, May 30, 2009

Chicken Parmesan


Earlier today, I looked over at John and asked him if he wanted anything in particular for dinner. I should have known his answer would be chicken parmesan. It's his favorite meal of all time. I usually only cook it on his birthday because it can be a pain to cook. This is the end of his week of stay-at-home-vacation so I decided to surprise him and actually make it for dinner tonight. This is a lower-fat (not fried) version.

Chicken Parmesan

3-4 chicken breasts
4-5 pieces of bread (I use a low calorie bread 40 cal per slice)
OR store bought fresh/dried bread crumbs... panko bread crumbs would be stellar!
fresh herbs such as basil & oregano (dried works fine too!)
eggbeaters (real eggs, work just as well)
mozzarella cheese, grated or thinly sliced
cooking spray

Surprisingly it's best to start with frozen chicken breasts for this. Partially thaw them in your microwave using the defrost setting. When it is partially defrosted it is easier to cut the chicken breasts into smaller cutlets. (Cut down the length of the entire breast.) If you have a really sharp knife you can cut each breast into three. Or, cut them into two (that's what I did) and pound them thinner with a meat mallet. I placed each piece of chicken in a heavy zipbag so it wouldn't be messy as I pounded.

In one shallow bowl, pour the eggbeaters or two eggs beaten with a splash of water. Season with salt and pepper. Using your food processor (or magic bullet) pulse bread until it is fine bread crumbs. Add herbs.

Pre-heat your oven to 350º and preheat a large non-stick skillet (I used a flat griddle.) Bread chicken by placing in the eggs, then coating with bread crumbs. Make sure your skillet is on medium high heat. Spray skillet with cooking spray. Place breaded chicken in skillet with plenty of room. If your skillet is small, cook in batches. When chicken starts to brown on one side, flip over and add mozzarella to top. If you are using a small skillet and need to cook in batches, as the chicken pieces finish, place them on a cookie sheet. If you are using a large enough (oven safe) griddle, then place the entire thing in the oven when all chicken has been flipped and topped with cheese. Bake for about 8-10 minutes or until chicken is cooked through and cheese has melted. It won't take long since it is cut so thin and has been started on the stove top.

Serve with noodles and marinara sauce.

Saturday, May 23, 2009

Spring Asparagus & Lemon Fettuccine


This dish was fantastic! I was browsing Weight Watchers website looking for some inspiration when I stumbled upon this asparagus recipe. John and I decided it was very delicious! Even my twins ate everything on their plate and asked for more. Izzie liked the asparagus more than Maddie, but both ate some of it. I gave them tips since that part is the most tender. The most exciting thing about this recipe is the endless possibilities. For instance, tonight I added some chicken leftover from a roasted chicken I made last night.

Spring Asparagus & Lemon Fettuccine

2 tsp butter
2 tsp olive oil
1 pound(s) asparagus, cut into 1-inch pieces
1/2 tsp table salt
1/4 tsp black pepper
1 large egg(s)
1 cup(s) fat-free half-and-half
1 tsp cornstarch, mixed with 1 tablespoon water
1/4 cup(s) parsley, fresh, chopped
2 tbsp grated Parmesan cheese
1 tbsp lemon zest
2 tbsp fresh lemon juice

  • Cook pasta according to package directions; drain and keep hot.
  • Meanwhile, place butter and oil in a large skillet; melt over medium heat. Add asparagus, sprinkle with salt and pepper and cook, stirring occasionally, until asparagus begins to brown, about 6 minutes; remove from skillet and set aside.

  • In a small bowl, whisk together egg and half and half; add to skillet used to cook asparagus. Place skillet over medium heat; add cornstarch mixture and cook, stirring constantly, until thickened. Remove skillet from heat. Add pasta, asparagus and remaining ingredients to skillet; stir to combine and serve immediately. Yields about 1 1/2 cups per serving. 7 points per serving.
-Amanda

Monday, May 18, 2009

Shepherd's Pie


This is a dish that I like to make for women who have just had a baby. At least that is what John, my husband says. He told me tonight that I've made it for several New Moms and I guess he's right. Especially the reason we ate it tonight was so I could make a double batch to bring some of it to my friend, Sarah who just delivered twin boys last Sunday. She requested no red meat, so I made this version with ground turkey meat.

Shepherd's Pie

About 1lb of ground turkey meat
1 small onion
1 stalk of celery
1 carrot
1/2 bell pepper
2 garlic cloves
3 tbs flour
1 cup of chicken broth, or beef broth
1 tbsp Worcestershire sauce
thyme
1 cup of peas
4 good size potatoes
1/2 cup milk
2 tlbsp butter
2 tsp of Ranch Dressing Packet


Peel and cut up potatoes in two to three inch cubes. Place in a pot and cover with water. Add one clove of garlic, whole. Add salt to the water. Bring to a boil. When you can pierce potatoes easily with a fork, they are done. Drain. Set aside.

While potatoes are boiling, start browning your turkey meat in a skillet set to med-high. Make sure to break up the meat with your spoon as it browns. Chop onion, celery, carrot and bell pepper. Add to meat as it is cooking. Mince up one garlic clove. Add it to the meat as well. Season with salt, pepper and thyme. Add Worcestershire sauce. Sprinkle flour across meat mixture. Stir to make sure the flour gets incorporated. Add broth of your choice. Bring to a boil, stirring occasionally until gravy thickens. Add peas.

Take drained potatoes and put back in pot. Add milk, butter, Ranch seasoning, salt and pepper. Mash (including the garlic clove.)

Place meat mixture in a casserole (or individual ramicans, like I did.) Top with mashed potatoes. Bake at 350 for 30 minutes. This meal can freeze well.
-Amanda

Saturday, May 16, 2009

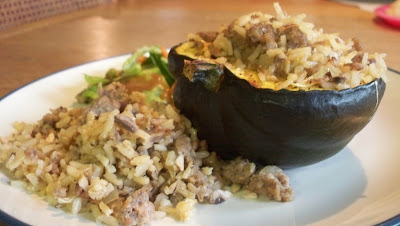
Stuffed Acorn Squash


Sorry I've been away for a few days. I went to my Mema's house where I got lots of delicious Southern food to fill me up and keep me inspired. Tonights meal wasn't Southern, but it's one of my very favorites. I even made a second version to be toddler friendly.

Stuffed Acorn Squash

2 Acorn Squash
1 cup of raw rice if making toddler version too, otherwise use 1/2 cup (I used brown)
5 button mushrooms
1/2 a small onion
1 package breakfast sausage (such as Owens)
salt & pepper
nutmeg (optional)

Prepare rice according to package directions. Preheat oven to 325º. Cut squash in half and scoop out the seeds. Place on a cookie sheet or casserole dish cut side up. Season with salt and pepper. Sprinkle a bit of nutmeg over the top. Place in oven and cook for 45 min. - 1 hr or until a fork can pierce the squash very easily.

Meanwhile, in a cast iron skillet (or other heavy bottom skillet) brown sausage, making sure to break it up with your spoon into small crumbles. Chop your onion and mushrooms very tiny. Add diced onion and mushrooms. Continue cooking until sausage is cooked through and onion is translucent. Stir in 1/2 of the cooked rice.

When squash is done, mound stuffing in the center and broil on HI for a few minutes. I like to serve extra stuffing on the side. (Save 1/4 cup of stuffing, for toddler dish) Serves 4


Toddler "Stuffed" Squash

1/2 cup rice (or 1/2 of rice left over from main dish)
1/4 cup of sausage & mushroom mixture
1/2 cup pureed squash (I used a can, but you can prepare an extra squash and puree it very easily. I just didn't have any extra one tonight)
1 egg
1/4 cup whole wheat flour

Puree rice in a blender with a small amount of water. Mix rice, sausage mixture, pureed squash, egg and wheat flour in a bowl. Spoon mixture on a hot griddle or skillet. It's very sticky. Cook until starts to brown, flip and cook second side. My mixture made 8 pancakes about the size of my palm. Freeze extras.

Toddler sides:
Steamed carrots
Honey Cinnamon Poached Pears
-Amanda

Friday, May 8, 2009

Mixed Grill Salad


Summertime! Time for grilled corn, squash and zucchini. All favorite vegetables of mine. This is a simple side dish that I served with a grilled ham steak and some fluffy biscuits. This dish was the star of the plate, even though it was a "side" dish.

Mixed Grilled Salad

2 zucchini
2 yellow squash
2 ears of corn
1 oz black olives (or your favorite)
2 oz feta cheese
2-3 tablespoons of Italian Dressing
non-stick spray or olive oil

Slice the zucchini and yellow squash lengthwise. Spray the cut surface with a non-stick spray or rub olive oil on it. On a hot grill place each zucchini and squash cut surface down. Let cook for about 10 minutes. Grill corn using Julie's method found HERE.

Once grilled, slice each zucchini and squash again lengthwise and then into 1 inch chunks. Stand corn on it's end and with a knife, carefully slice the kernels off the cob. Mix in a bowl. Add feta cheese, black olives, and dressing. Stir and serve. Serves about 4.

Wednesday, May 6, 2009

Healthy Chicken Florentine


A few nights ago, I was going through my freezer and I came across a box of spinach. Chicken Florentine immediately popped into my head. I've never made it before and I'm not sure I've even eaten it before. I looked up a few recipes online and they all had heavy cream or tons of cheese. So, I created this, a healthy and very tasty version of chicken florentine. And surprisingly enough, this got high marks from my twin toddlers.

Healthy Chicken Florentine

4 oz small noodles of your choice (I used wheat to make it even healthier!)
8 oz chicken breast, cut in small pieces
1 package frozen spinach
1 small onion
1 large clove of garlic
2 cups of chicken stock
3 tbsp flour
1 tbsp cream cheese

Prepare pasta according to package directions.
Chop onion. Saute on low heat until translucent. While onion is cooking, defrost spinach in microwave. It took my microwave 7 minutes. Drain very thoroughly by putting the spinach in a strainer and pushing it with your spoon to remove all the excess water. Set spinach aside. Mince garlic. In a small sauce pan put garlic, flour and chicken stock. Season with salt and pepper. Whisk until flour dissolve. Bring to a boil, stirring frequently.

Add chicken to the onions and stir until almost cooked through. Add drained spinach. Sauce should be thick by now, add the cream cheese and stir until melted. Drain pasta, add to chicken. Pour sauce over chicken and stir. Serves 2.

Weight Watchers (per serving):
chicken: 1pt per oz
pasta: 3pts for 2 oz
sauce: 1pt

-Amanda

Friday, May 1, 2009

Apple Stuffed Pork Chops


These pork chops were pretty tasty. They came from a pig on my brother-in-laws farm. They were cut a bit smaller than what I'm used to seeing porkchops be, but my mom said that it could be a "breakfast" cut. I still managed to cut a slit in each chop and stuff it them with my apple stuffing. I served this with a side of sauted cabbage and garlic bread.

Apple Stuffed Pork Chops

8 pork chops
1 apple
1 stalk celery
1/2 onion
1/4 bell pepper
1 cup cooked brown rice
1/8 tsp sage

Chop onion and bell pepper into small dice and sautè in a small skillet. Dice apple and celery. When onion starts to brown add the apple and celery. Add cooked brown rice and seasonings. Cut a slit into each pork chop and stuff with apple mixture. Place in a baking dish and bake at 350º for 30 minutes. (My porkchops were only 1/2" thick, before stuffing. If you have thicker porkchops you will need to cook for longer.) Serves 8.

Sides: Sauted cabbage and garlic bread.
-Amanda

Grilled Corn on the Cob


I’ll admit it, I’m not usually a big fan of corn unless it’s in chip form. I don’t mind it in things, like soup, but as a side dish, meh. If there’s canned corn in my house, it’s likely the first thing I’ll donate to the food pantry.

Grilled corn on the cob is the big exception. And now that spring is here, beautiful cobs are starting to show up at the markets for reasonable prices. I grabbed a few ears and slathered them up for the grill. By the end of dinner, not a kernel was left. We did have to do a lot of flossing though.


Grilled Corn on the Cob

1-However Many Ears of Corn
½ Tbsp. Margarine or Butter (per Ear)
Seasoning to Taste (see below)


Shuck the corn, leaving the stem in place for easy handling. Remove the silks by rubbing a toothbrush along the kernels in the opposite direction (tip to stem). This will remove most everything, and anything left will burn off from the heat of the grill.

Now for the messy part: use your hands to rub the butter all over the ear of corn (make sure you washed up first!). Sprinkle on your seasoning of choice. Recommendations: dill, cumin, or my personal favorite – Cajun spice.

Place on your grill over medium high heat until the kernels start to blacken. Alternatively, you can roast the corn in an oven (400◦ for 30-40 minutes). If you don’t like the blackened grill marks, either wrap the corn in foil or shuck the corn without removing the husks (bend them back) and fold them back over after the corn is buttered and seasoned. The husks will blacken and burn, but the corn won’t.
Blog Widget by LinkWithin