Showing posts with label condiment. Show all posts

Monday, July 11, 2011

Apple & Bacon Salad

I'm trying to add a few more salads into the rotation because they are usually pretty quick to make and for summer, salads just seem right. This was a very hearty and tasty salad that was approved by everyone. John said he thought the avocados were a bit odd in it and I think my girls were just going to eat the bacon until I encouraged them to taste a bit more! I think some dehydrated cranberries would be good in this too!
-Amanda

Apple and Bacon Salad

1/2 head of lettuce
2 handfuls of fresh spinach
1 package of bacon
1 avocado
1 large apple, chopped
1 cup of slivered, freshly toasted almonds
1/2 a cucumber, sliced
1/4 purple onion
homemade honey mustard dressing (see below)

Cut bacon into bite size pieces and cook until crispy. Chop lettuce and spinach into bite size pieces. Wash and dry thoroughly. Add to a very large salad bowl. Add diced apple, avocado, toasted almonds, chopped cucumber, thinly sliced onion and drained bacon. Toss. Serve with honey mustard dressing. Made enough for two adult portions. 


Honey Mustard Dressing
(these are NOT exact amounts, I just eye balled it!!)

1 tsp mustard (I got to use my homemade mustard!)
2 tsp honey
1 tbsp rice wine vinegar
1/4 cup avocado oil
1/4 cup olive oil (If you don't have avocado oil, just use olive oil)
1 grated garlic clove
salt and pepper
pinch of dried herb such as thyme, tarragon or oregano (optional)

In a small bowl, whisk honey and mustard together. Drizzle oils in slowly whisking continuously. Add rice wine vinegar, garlic and salt. If it is too thick and the flavor is good, add a bit of water. Otherwise adjust oil and vinegar until you get the acidity level that is good for you.

Tuesday, July 5, 2011

Mustard

My first batch of homemade mustard hits the fridge... (it's sitting next to some homemade yogurt and strawberry flavored kombucha.) Of all the condiments, this should be the first to make homemade because it is so easy it's hardly a recipe. My friend Nicole Rice of A Life Well Nourished, shared the method with me and I had to call her twice to make sure there wasn't "anything" else to it. All it really needs is a bit of patience! I made a bunch, because I know we'll go through it fairly quickly and because it is fermented it will last a long time.
-Amanda

Probiotic Mustard

about two cups of plain very strong kombucha
8 oz of mustard seed
3 cloves of garlic

Pour mustard seed in a jar that is twice as tall as the seed, to give it room to rehydrate. Add garlic cloves. Cover with strong kombucha. (My timing worked out perfectly for this recipe because right when I wanted to do it, I had some kombucha that I'd been ignoring in my pantry for about 2 months that was very strong!) The first day or so watch the mustard and as it starts to expand (rehydrate) keep covering with kombucha, you want all the seeds to be under the liquid. Set on your counter and let ferment for 5-7 days. Pour in a blender and puree. You've got mustard. Nicole likes to add horseradish while pureeing, but I found it was pretty spicy on its own. I added honey because we love honey mustard.

Sunday, June 26, 2011

Hamburger Salad with Homemade Ranch Dressing

Sorry I did not take a photo! Tonight I made hamburgers for the family but I ate mine sans bun. I made a big salad for everyone to enjoy with their hamburger, but I broke my patty up and incorporated it into the salad. It was actually really good and I didn't miss the bun. The salad was romaine lettuce (I wanted bib lettuce but they didn't have it at the store), boiled eggs, avocado, cucumber, bacon, colby jack cheese and the hamburger for me. Topped with homemade ranch dressing, it was very satisfying!
-Amanda

Homemade Ranch Dressing

There are lots of versions of ranch dressing on the internet. You can get really complicated or keep it simple. I take the time to make my own mayo as the base because I think that is important. This way you get healthy oils instead of rancid factory oils like canola, soy or vegetable oils. I actually made this batch of mayo with a bacon grease/sesame seed oil base! Make sure your bacon is nitrate free, of course. For the ranch, I like about equal parts mayo and sour cream, but you can play around with how tart you like it with what ratio you add.

1 part mayo
1 part sour cream
sprinkle of dried garlic, or fresh grated garlic
pinch of dill, fresh or dried
salt and pepper

Mix and serve!

Tuesday, May 17, 2011

Roasted Tomato Salsa

First off, I know this isn't the best photo. But I was so busy eating it, I didn't want to slow down to photograph it! I really want to write down this recipe so I can repeat it in the future but I didn't really count everything so it's just sort of a guess. I plan on adding whey to what we didn't eat tonight and fermenting the rest to make it last longer (ha!) and to add probiotics to it. That is if it can sit on my counter for 3 days without being gobbled up... we'll see.
-Amanda

Roasted Tomato Salsa

8-10 tomatoes
1 red bell pepper
3 pablano peppers (you can throw in a spicy pepper or two also, but I just wanted the flavor, not the heat this time.)
1 large onion
5-6 cloves of garlic (paper still on)
Olive oil
sea salt

Line a cookie sheet (that has edges!) with foil. Lay the peppers out. You can keep them whole or go ahead and cut them in half and seed them. I seeded my bell pepper but kept the pablanos whole. Toss the garlic cloves still in their husks on the tray. Quarter the onion, removing the outer skin and place it on the tray. Cut each tomato in half and with a melon scooper, scoop out all the seeds and juice. Place cut side down on the tray. Liberally drizzle olive oil on everything and sprinkle with salt. Bake at 425 for 30 minutes or until everything starts to brown a bit.

Add vegetables to your blender, removing the skins from the tomatoes and peppers as much as possible. They should peel right off. Pulse a few times to keep things chunky but blended. Add salt as needed. Enjoy!

To ferment add 3-4 tbsp of whey, put in mason jars and let sit out on counter for 3-4 days until bubbles form. Refrigerate when done fermenting.

Friday, March 25, 2011

Lacto-Fermented Hot Sauce

Ever since learning about Lacto-Fermented foods and the nutritional benefits that fermented foods provide, I've been so excited to learn new recipes. Creating lacto-fermented foods is so incredibly easy, the hardest part is to get over the fact that most of us were raised to fear bacteria. For some reason we all know that yogurt is good for us because it has "live-active cultures." Well, I'm learning how to put those "live-active cultures" in ketchup, hot sauce, mayonnaise, pickles, pickled vegetables and more. Those live-active cultures are also known as probiotics and they help keep the flora in our guts in balance. They aide in digestion and they help fight off common colds.

I got this recipe from The Nourished Kitchen, where she made her sauce with scotch bonnets. Her hot sauce is just that HOT! I used jalepenos so mine should be called more of a "mild" sauce. I also passed my sauce through a very fine sieve so it is more liquidy than hers. All of this is to your preferences and it is fun to experiment. You are left over with chili paste, that would be great to use in marinades, stir-frys and such. Remember heating anything that you lacto-ferment over 110 degrees kills the good bacterias and enzymes, but sometimes lacto-fermenting is just used as a way of preservation. The chili paste, once fermented will last months in your fridge.
-Amanda

Lacto-Fermented Hot Sauce

3 lbs of chilis (I think I only used two, but these types of recipes are very forgiving!)
3-6 cloves of garlic
2 tbsp of sugar
2 tsp of sea salt
1/4 cup of whey

Cut off the stems of your chilis and place them in a food processor. Throw in your garlic cloves and pulse until you get a pasty texture. Add the salt, sugar and whey and process a few more times to mix. Transfer to a glass jar and let sit on the counter for 4-5 days until you see some bubble action. Strain using a mesh strainer and you have hot sauce and chili paste!

Friday, February 4, 2011

How to fix messed up Homemade Mayonnaise

I've been making homemade mayo for a few months now. The taste doesn't even begin to compare to store bought. One day when I was making it the girls asked what I was doing. I told them I was making mayonnaise and of course they wanted to taste it. I stuck the tip of a spoon in the mayo and let them taste it. They then wanted to eat it by the spoonful! We use it like a dip, using it sometimes instead of ketchup on our hotdogs and sausages. And when you make it with pastured chicken eggs, healthy oils and even ferment it a bit for probiotics, it's good to eat by the spoonful if you so wish to! Evey once in awhile something goes wrong when you make homemade mayo. Usually you don't get an emulsification going with your egg yolk before you start pouring in your oil. Well this has happened to me twice, and I just wanted to let you know... it can be fixed!!!

The recipe is here: How to make Homemade Mayonnaise. I don't use the whites every time. Sometimes I save them back for other recipes, by freezing them.

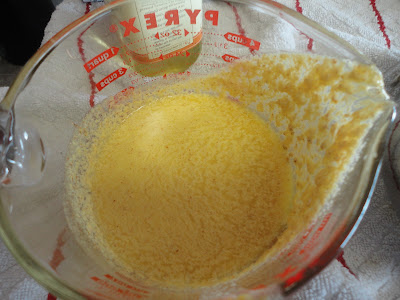
Yuck... didn't emulsify when I used my food processor today.

If your mayo isn't emulsifying correctly pour it from your processor/blender into a pourable mixing cup. I actually had about a little over a cup of oil/mustard/egg/lemon here before I realized it wasn't going too well!

Clean out your blender or move onto another device. Today I messed up twice. (Last time this happened to me I fixed it on the second go, today it took me three total tries.) I moved from my processor to my blender, but when that didn't work, I pulled out the metal bowl and whisk.I wasn't going to give up! Doing it by hand can be harder but it is easier to see how the emulsification is going.

In a clean bowl (or clean blender) break one new egg yolk and 1 tsp of mustard. Whisk and whisk until the egg yolk barely starts to get fluffy. Then slowly, slowly, slowly drizzle a bit of the "ruined" mayo into the egg. Set it down and whisk until it is completely incorporated. Pour a couple of teaspoons in at a time, whisking the entire time. I found it was easier to pour, sit the oil mixture down, and whisk again. Then repeat.

Eventually it will get thick and yummy! Taste and add more lemon/salt as needed. The yolks from pastured chickens will make the mayonnaise more yellow than store bought. Add a couple of tablespoons of whey (strained from yogurt) and set the mayo out at room temperature for 7 hours. This will ferment the mayo (adding probiotics!) and preserving it so it will last for weeks in your refrigerator instead of a few days. When I first heard about this I was a bit skeptical too, but sure enough it works!

(I entered this post in Kelly the Kitchen Kop's Real Food Wednesdays!)

Sunday, November 28, 2010

Homemade Cream of Mushroom Soup

I think canned cream of mushroom soup is an ingredient in almost every single American casserole, isn't it? I finally started making it from scratch. It takes a bit more effort, so casseroles aren't as easy to throw together, but the taste is out of this world delicious. Make sure you use organic cream, preferably not pasteurized. I hope to make it out to Urban Acres soon where my friend, Nicole, told me I can get low-pasteurized cream. I'm wondering if this sauce would freeze. Well, haha... ice cream obviously freezes... thoughts on if this mushroom sauce would freeze?
-Amanda

Mushroom Sauce:
a lot of mushrooms- 5 cups or so
1/2 large onion finely diced
1 pint of heavy cream preferably not pasteurized, but I haven't been able to get any of that yet.
1/4 cup flour - I used whole wheat
3 tbsp butter

To make the mushroom sauce, chop onion very small and place it in a large skillet with melted butter. Chop mushrooms as small as you like. Since I was again, mimicking the canned sauce, I chopped them fine since the canned stuff almost doesn't even hint at mushroom.... strange, right? Add the mushrooms to the softened, translucent onions and cook until they have cooked down quite a bit. Add more butter if the skillet is dry. Sprinkle flour across mushrooms and stir until there is no dry flour left. Pour in cream and bring to a boil to thicken.

Saturday, November 20, 2010

Homemade Mayonnaise

I finally had a batch of homemade mayonnaise that came out delicious! I was using extra virgin olive oil to make it which made the final product way too strong for my tastes. So tonight I made it with a mixture of safflower oil and coconut oil and it came out great. I started making my own mayo because most store bought mayonnaise (along with most bottled sauces) contain soy oils. Just spend a moment googling "dangers of soy" to see what people are finding out about soy, something alot of Americans think of as a health food. In truth, only fermented soy products (like traditional fermented soy sauce and natto a fermented soy bean) are healthy and good for you. Almost all of America eats a GMO (Genetically Modified Organism) Soy that is a far cry from traditional Asian fare. So, go ahead and eliminate soy products from your diet. Homemade mayonnaise is so tasty you won't miss the store bought at all!
-Amanda


Homemade Mayo

1 egg - from a pasture raised, cage free chicken
1 egg yolk - from a pasture raised, cage free chicken
2 tbsp lemon juice
1-2 tbsp mustard (I used a dijon today)
1- 1.5 cups of oil in any combination. Untoasted Sesame Oil, olive oil and coconut oil are good to start with
salt to taste

Make sure your food processor has a place where you can drip in an oil. Otherwise you can do this by hand in a bowl with either a whisk or a hand mixer. In your food processor put the egg and the egg yolk. Process a few times until the egg becomes blended. Add the mustard and process a few more times. Slowly add the lemon juice and salt. Then while the processor is running very, very slowly start pouring in your oil. Keep going until you notice the mayo will suddenly lighten up in color and get thicker (if you are using olive oil, it may not lighten too much and may even have a greenish tint, this is okay.) When you can make peaks out of the mayo with your tasting spoon you are done. Store in an airtight container in the refridgerator.
Blog Widget by LinkWithin