Thursday, February 24, 2011

Sarma (Stuffed Grape Leaves)

I apopogize for the lack of posting on my end.  Between the longest chest cold known to man, exams, starting a MA and transcontnentail travel  I have been doiong the bare minimum to keep us from staving to death, and a lot of take out.

I am back…cooking and posting.  Which is good because this recipe is extremly time consuming.  I love sarma, sometimes called dolma. Grape leaves stuffed with rice and beef, served with yogurt on top. It is worth every minute.

-Jules

Sarma

Ingredients

1 1/2 pounds of ground beef
3 onions diced finely
1 tsp of salt
2 cups of uncooked short grain rice
1/2 cup of water
5 tablespoons of tomato paste
2 1/2 of black pepper
1/4 cup of olive oil
3 teaspoons of mint
75 to 100 medium grape leaves
If you can’t find fresh, brined will do.
1 lemon

Take all of the ingredients above and combine, except the grapeleaves and the lemon.  Mix thoroughly. The seasoning will be most evenly distributed if you knead it with your hands.

Set the mixture aside.  Wash the leaves, then place them in a boiling pot of water for 5 minutes, until tender, but not too soft.  If the leaves were brined soak them in cool water and rinse before use.  Firmly squeeze out any water, but be careful not to rip the leaves.

To Fill

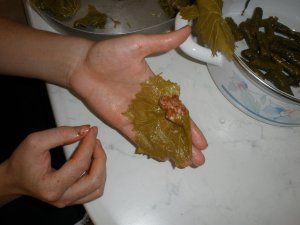
Gently separate each leaf, (I recommend readying several at once then rolling assembly style) tear off the steam. Holding the leaf vein side up, place a small amount of filling horizontally

1. Looking at your left palm, turn down the right corner of the leaf

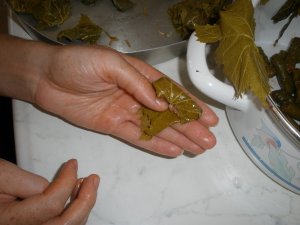
2. Now the left corner.

3. & 4. Bring first the right then the left sides of the leaf in, in a parallel fold

3. Fold

4. Fold

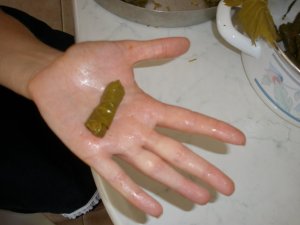
5. Now the tricky part. Using your thumb to keep the roll tight, start rolling the filling down towards the bottom of the leaf.

Keep it Tight (or it will spill all over the place)

Whew! Finished!

Now, go make a hundred more. Make sure not to stuff them too much or when the rice expands during cooking it will burst the grape leaf.  When you are finished, take a heavy bottomed pot with a lid, cover the bottom with grape leaves(the ones that ripped or seemed tough), then carefully place your sarmas inside, seam side down, close together but not tightly packed. Place them in concentric circles leaving the middle of the pot open. 

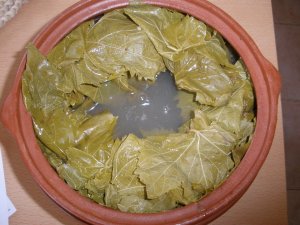
Add enough water to cover the sarmas (I used the water I cooked the grape leaves in, because it has all the nutrients from the grape leaves.) Juice the lemon and add it to the water. Cook on the stovetop on a low heat, for about an hour, until the rice is done. At 50 minutes, check on the rice, if it is not done, give it another 10 minutes or so. When serving, it is great with yogurt on top. I love to add mashed garlic to my yogurt, and then spoon it on top.

Wednesday, February 23, 2011

Parmesan and Almond Crusted Chicken with Tomato Cream Sauce

This was a relatively easy dinner to throw together in under thirty minutes and it was very tasty. I also served some broccoli with it, I meant to pull out a salad but forgot. Just as the dinner was finishing the girls got a bit cranky and I lost my train of thought. It's how it goes sometimes! With the title I gave it you almost don't need a recipe!
-Amanda

Parmesan and Almond Crusted Chicken with Tomato Cream Sauce

2 large chicken breasts
1/2 cup lard
1 cup of "crispy*" almonds, processed into flour with a food processor
1/2 cup freshly grated parmesan cheese
Italian Season blend of spices
sea salt and pepper

Sauce:
1/2 can of tomato paste
3/4 cup of cream
sea salt
3 ice cubes worth of homemade chicken stock (or about 1/2 cup)
basil to taste

Slice chicken into very thin scallapini and pound with a meat hammer. In a shallow dish, mix the almond "flour" which is just almonds processed in a food processor, parmesan cheese, sea salt, pepper and italian seasonings.

In a cast iron skillet, melt the lard until it is very hot. Dredge chicken into almond, parmesan mixture and shake off excess. Place in skillet and pan fry until golden. Flip and cook the other side. Work in small batches to not crowd the pan.

For tomaoto cream sauce, in a small pot, whisk the cream, tomato paste, chicken stock (I just threw the cubes in frozen) and season with salt and basil. I have frozen pesto in ice cubes and one cube of that would have been really good too. Bring to a boil and serve over chicken.


Crispy Nuts- a recipe by Sally Fallon. Soaking your nuts in salt water gets rid of the phytic acid in the nuts, an anti-nutrient that is very hard to digest and isn't good for your body. Use about 1 tsp of salt per cup of nuts. Cover the nuts with filtered water and stir in salt. Let them soak for 24 hours. Drain, and spread out on a cookie sheet and bake at 150 (or as low as your oven goes) for 12 hours. Or use a dehydrator until they are completely dry and crispy.

Homemade Yogurt, updated

(Not my photo: I'll replace soon.)

Homemade yogurt isn't as scary as it sounds. I'm not an expert, I've only made it a handful of times, but it is easy to make. If you are using raw milk, it will be runnier than store-bought yogurt. The time I made it with raw milk it was more like drinkable yogurt, just a bit thicker than heavy cream. This is still really good for you as it has all the probiotics that yogurt has and all the healthy enzymes that raw milk makes available to you. To make your raw milk yogurt thicker it is suggested to bring it up to a boil. This will break down some of the good enzymes, but it is still healthier than buying pasterized homogenized milk to start with. Another trick I heard to make raw milk yogurt thicker is to do half raw milk and half heavy cream as your base. I haven't tried that either. I have made yogurt with raw milk and store bought organic pasteurized/homogenized milk. Do not use Ultra Pasteurized, which is a DEAD product and the good bacteria that make yogurt litterally has nothing to eat in the milk to make it into yogurt. (Think about that.... if a single cell bacteria cannot live off of ultra pasteurized milk, why put it in our bodies?? It offers us nothing nutrition wise!)

Process:
Bring 1 quart of whole (raw) milk to 110 degrees. Like I said before you can do half milk/half cream (or any percentage you choose.) If you bring the milk up to a boil, then cool it to 110 before proceeding.

Add a mere 2 tbsp of yogurt from a previous batch OR store bought. Buy a high quality whole milk, no additives, plain yogurt. I like to start with a Greek yogurt. You can also buy starters from websites like Cultures for Health.

Whisk the 2 tbsp of yogurt into your warmed milk. Then pour into either several small containers or one large container. Whatever your prefrence is. Then you need to incubate the yogurt for 10-12 hours at 110 degrees. You can go further but any extra time makes the yogurt more and more tangy.

Incubation methods:
1.Expensive yogurt maker.
2. Dehydrator with trays removed set to 110 degrees is the easiest way that I've found.
3. Crock pot brought up to high temperature and then unplugged, wrapped in a towel for extra insulation.
4. In an empty oven with oven light on.
5. Sat on a heating pad on low, wrapped in towels.

(The only two methods I've tried are 2 & 3, but I've heard great success with the others.)

After the 10-12 hours move to refridgerator. You can add honey and fruit to sweeten. I like to puree fruit and then gently stir the yogurt. I find if I try to puree the fruit into the yogurt it gets even more runny. Or I chop the fruit and stir yogurt in with a drizzle of honey or pure grade B maple syrup. 

Thursday, February 17, 2011

Salmon with Avocado Sauce

Last time salmon went on sale I bought some. Now I wish I had bought more, because I forgot how much I love it and my girls really love it! I also bought avocado. The thought was that the avocado would go with taco meat or something during the week. Well weeks go like they do and the tacos never got made, but the salmon got thawed out and the avocado was ripe. I got to thinking and wondered if an avocado sauce would be good on salmon. I usually do a dill lemon thing with salmon. Well for all those wondering, avocado and salmon do go good together. At least my family thought so! Sorry for no photo, I hate posting recipes with no photos, but as things sometimes go, dinner was over half an hour late and my family was chopping at the bit... not time for pictures!
-Amanda

Salmon with Avocado Sauce

4 portions of salmon
1 tbsp olive oil
salt & pepper
1 avocado
1/2 lemon
1/4 cup extra virgin olive oil
1 small clove of garlic
1 tbsp minced onion
1 tbsp real maple syrup
pinch of cumin
salt

Pat fish dry and add seasoning. preheat a cast iron skillet and add 1 tbsp olive oil. When it is very hot, add fish and cook about 4 minutes per side.

In a food processor put the onion and garlic. Pulse to chop. Add avocado, lemon, olive oil and maple syrup. Add enough salt to taste and the cumin.

Spoon avocado sauce on plate and place fish on top. The green and pink are very pretty together!

Thursday, February 10, 2011

Maddie's Recipe

Not the best photo, but I was in a hurry to leave for a meeting. Last Tuesday, I had a PAMOM meeting to go to and I was looking to make a quick dinner for the kids. John was going to eat leftovers so I didn't have to worry about him. Izzie was off in the other room playing and Maddie was with me in the kitchen. As I was staring in the refridgerator for inspiration I asked her what she wanted for dinner. She said, "I want broccoli, carrots, hot dogs, cheese, and bananas. Mix it all together. Okay... that's what I want."

So I quickly chopped up the carrots, broccoli and hotdog. I sauted the carrots and broccoli in a pat of butter until soft. Then I tossed in cut up hotdog. I added a tbsp of flour, a bit of cream and half a cup of freshly grated cheddar cheese. Luckily I was able to convince her that the banana would taste better on the side. So here  you go, my three year old's first recipe! Enjoy!
-Amanda

Saturday, February 5, 2011

Homemade Texas Chili


Just so you know, authentic Texas Chili is not cooked with beans. Some may argue, but it really is true. It's not made with ground beef either. There is a lot of mystique around Texas Chili and it sounds all complicated (and it can be) but most of the time, it really is easy to make as long as you've got patience on your side. The results are so worth it, so kick back and stir you up a big ol' pot of Texas Chili, hold the beans, please! (Like usual, I didn't measure so adjust to your preferences, these are all guesses.)

This recipe has been submitted to Kelly the Kitchen Kop's Real Food Wednesday Blog Carnival.
-Amanda

Texas Chili

1.5 lbs of stew meat
1 onion
3-4 cloves of garlic
3-4 slices of bacon
1 can of fire roasted tomatoes
1 can of tomato paste
3-4 cups of homemade bone beef broth
1/2 - 3/4 cup of minced beef liver (okay, this is not traditional to Texas Chili*)
1/4 cup Braggs apple cider vinegar**
1 tbsp of chopped ancho chili in adobe sauce
2 chopped fire roasted anaheim chilies
3-4 tbsp chili powder
2 tbsp dried oregano
1 tbsp ground cumin
salt

garnish:
Sour cream
Raw milk cheddar cheese
Diced green onion
1 tbsp coconut oil per bowl***

Cut bacon into small dice. Place in a large pot (cast iron dutch oven is traditional, I didn't use my tonight though) and cook until almost crispy. Meanwhile chop one onion into a small dice. Add it to the bacon and cook on a medium low heat until the onion is very translucent. Do not rush this step. When onions are translucent, add minced garlic. Then put in your anaheim chili and ancho chili (or any chilies you want, really.)

Next go in the spices. Add the chili powder, oregano, cumin and generous amount of salt. Stir well to "toast" the seasonings. Add the tomato paste, and again stir in well. You want to actually get "color" on the tomato paste developing flavor. Stay on a medium heat, you want color, not burn. At this point you want to deglaze the skillet. That means add a liquid to pull up the brown bits that are starting to stick to you pot. Traditionally you'd use a beer, but I grabbed apple cider vinegar instead.

This is a good time to add the liver. Make sure the liver is chopped extremely well or even puree it in a food processor. Next goes in the stew meat. Stir to coat the meat with all of the spices. Add 3-4 cups of homemade bone-beef broth. The chili will be very soupy at this point. Lower the heat and let simmer for hours. I started my soup at 1pm and we ate at 7pm. The longer it just sits and slightly bubbles the better, just walk by and stir it every once in awhile. Somwhere after about 4 hours or so you can start to tear apart the beef. It'll start to shred and fall apart. That is why there is no flour in this meal. The broth will slowly reduce from simmering and the beef shredding will soak up the additional broth. You will be left with a thick and delicious chili. Enjoy!

* LIVER: From the Weston A. Price Foundation website: So what makes liver so wonderful? Quite simply, it contains more nutrients, gram for gram, than any other food. In summary, liver provides:
  • An excellent source of high-quality protein
  • Nature’s most concentrated source of vitamin A
  • All the B vitamins in abundance, particularly vitamin B12
  • One of our best sources of folic acid
  • A highly usable form of iron
  • Trace elements such as copper, zinc and chromium; liver is our best source of copper
  • An unidentified anti-fatigue factor
  • CoQ10, a nutrient that is especially important for cardio-vascular function
  • A good source of purines, nitrogen-containing compounds that serve as precursors for DNA and RNA.
** APPLE CIDER VINEGAR: I've been using Braggs Apple Cider Vinegar more often because of it's health benefits. I'm sure cooking it all day, probably rids some of the nutritioun, but I needed something to deglaze the pan with and figured it wouldn't hurt. Here are some of the benefits of a REAL apple cider vinegar, such as Braggs brand:
  • Rich in enzymes & potassium
  • Support a healthy immune system
  • Helps control weight
  • Promotes digestion & ph Balance
  • Helps soothe dry throats
  • Helps remove body sludge toxins
*** COCONUT OIL: I try to add coconut oil to anything I can. It is very healthy for you. Among other things, it aids in metabolism, helping to lose weight. (More info here.)

Friday, February 4, 2011

How to fix messed up Homemade Mayonnaise

I've been making homemade mayo for a few months now. The taste doesn't even begin to compare to store bought. One day when I was making it the girls asked what I was doing. I told them I was making mayonnaise and of course they wanted to taste it. I stuck the tip of a spoon in the mayo and let them taste it. They then wanted to eat it by the spoonful! We use it like a dip, using it sometimes instead of ketchup on our hotdogs and sausages. And when you make it with pastured chicken eggs, healthy oils and even ferment it a bit for probiotics, it's good to eat by the spoonful if you so wish to! Evey once in awhile something goes wrong when you make homemade mayo. Usually you don't get an emulsification going with your egg yolk before you start pouring in your oil. Well this has happened to me twice, and I just wanted to let you know... it can be fixed!!!

The recipe is here: How to make Homemade Mayonnaise. I don't use the whites every time. Sometimes I save them back for other recipes, by freezing them.

Yuck... didn't emulsify when I used my food processor today.

If your mayo isn't emulsifying correctly pour it from your processor/blender into a pourable mixing cup. I actually had about a little over a cup of oil/mustard/egg/lemon here before I realized it wasn't going too well!

Clean out your blender or move onto another device. Today I messed up twice. (Last time this happened to me I fixed it on the second go, today it took me three total tries.) I moved from my processor to my blender, but when that didn't work, I pulled out the metal bowl and whisk.I wasn't going to give up! Doing it by hand can be harder but it is easier to see how the emulsification is going.

In a clean bowl (or clean blender) break one new egg yolk and 1 tsp of mustard. Whisk and whisk until the egg yolk barely starts to get fluffy. Then slowly, slowly, slowly drizzle a bit of the "ruined" mayo into the egg. Set it down and whisk until it is completely incorporated. Pour a couple of teaspoons in at a time, whisking the entire time. I found it was easier to pour, sit the oil mixture down, and whisk again. Then repeat.

Eventually it will get thick and yummy! Taste and add more lemon/salt as needed. The yolks from pastured chickens will make the mayonnaise more yellow than store bought. Add a couple of tablespoons of whey (strained from yogurt) and set the mayo out at room temperature for 7 hours. This will ferment the mayo (adding probiotics!) and preserving it so it will last for weeks in your refrigerator instead of a few days. When I first heard about this I was a bit skeptical too, but sure enough it works!

(I entered this post in Kelly the Kitchen Kop's Real Food Wednesdays!)

Thursday, February 3, 2011

Kombucha

I wrote a few months ago that I was going to start making Kombucha and I was nervous about how it would turn out. These days besides a bit of water, Kombucha and Water Kefir are all I drink. I'm finally rid of soda in my life and I don't miss it a bit! Now when I drink kombucha I know I'm doing something good for my body instead of feeling guilty everytime I used to drink a soda. Kombucha is naturally carbonated and it is full of probiotics. My favorite way to flavor it is strawberry, but tonight I decided to try blueberry and raspberry for the first time. You can flavor it with whole fruit or juice, but I found that the whole fruit is better. I use frozen fruit for convenience. One thing I've learned is that this is pretty hard to mess up! The SCOBY, converts all the sugar into something that isn't bad for you. You add sugar for a "second" fermentation (or the fruit) to help with the carbonation.

-Amanda

Kombucha

about 1 gallon of filtered water
6-8 black tea bags, preferably organic, for the healthy of the SCOBY
1 cup of organic white sugar, turbanido or rapadura. Succant isn't preferred.
1-2 cups of plain kombucha from previous batch (your SCOBY will come with some.)
1 SCOBY, acquired on line from a place like Cultures for Health or from a friend.

Make a batch of sweet tea, using the filtered water. A Brita filter system works fine. You want something that will remove the choline, or it will kill the SCOBY. When tea is room temperature, add SCOBY and Kombucha from previous batch. Cover with a tightly woven cloth (I used a t-shirt doubled over) and a rubberband. Fruit flies and gnats are attracted to kombucha I hear and you don't want them laying eggs in your SCOBY! I haven't had any problems, but it isn't exactly the season for them either.

Leave your covered Kombucha in a darkish place where it will be undisturbed for 7 - 10 days. Then bottle it. You can add fruit when you bottle it or add 1 tsp sugar per cup for plain Kombucha. If you use fruit, I'd say 1-2 whole strawberries per 16 oz. So it isn't much. If you use fruit juice you are only going to use about 1 oz to flavor 15 oz of Kombucha, it isn't much. Let sit at room temperature for 1-3 days (you can go longer, it will just get stronger.) Refrigerate and enjoy!

 Top view, SCOBY floating on top of tea (now Kombucha.) By the way if your SCOBY sinks, that is okay!

 The SCOBY will regenerate after 7 days. You can kind of see the old SCOBY hanging down, and the new one is on top. The old SCOBY you can give to a friend or put in your compost pile. (I throw mine in my garden)

My "new" SCOBY, the old one is floating in the Kombucha still. Holes are okay.

My bottled Kombucha, now sitting for it's second fermentation. I did blueberry, 2 strawberries and a raspberry. Sometimes I bottle it in individual bottles using old store bought Kombucha bottles, old beer bottles or swing top bottles. (I bought a beer capper at Amazon for $15.) This time I just poured it in old yogurt containers, old juice bottles and a pickle bottle! Don't store Kombucha in plastic, it will kill the SCOBY.

UPDATE 3/17/11: My SCOBY (also known as a Mother) gave birth... I gave my first SCOBY away to my friend Wendy so that she can now make Kombucha at her house. Read more about her Kombucha project at her blog: Just One Momma.

Tuesday, February 1, 2011

Kale Chips

Why haven't I tried this sooner? These are so good! Next time you are craving a savory salt treat, try these. Kale is super good for you and you won't even know you are eating something healthy when you munch into this crispy treat. As a matter of fact, my three year old twin daughters who have been known to turn their noses up at a vegetable or two literally couldn't get enough of these tonight. I should have made twice as many!
-Amanda

Cristpy Kale Chips

1 bunch of kale
1-2 tbsp extra virgin olive oil
garlic powder
sea salt
splash of apple cider vinegar

Preheat oven to 425 with your cookie sheet in the oven. Cut the stems out of the kale leaves and cut the kale into smaller pieces. Place them in a large bowl. Toss with olive oil, garlic powder, sea salt and apple cider vinegar. Coat really well, make sure the olive oil is on each part of the leaves. Remove cookie sheet from oven and pour kale onto hot sheet. Spread in one layer. Bake 10-12  minutes. Remove before they start to turn brown. The brown parts are a bit bitter. Enjoy! I've known people to crumble this up on their popcorn, it's that good.
Blog Widget by LinkWithin